The Blue Yeti offers remarkably simple setup; just plug it into your Mac or PC and begin recording—no drivers are needed!
It’s effortlessly compatible with streaming software like Discord, OBS, and XSplit, making it ideal for content creators.
What is the Blue Yeti?
The Blue Yeti is a USB microphone renowned for its versatility and high-quality audio capture. It’s designed for a wide range of applications, from podcasting and streaming to recording music and voiceovers.
Notably, the Yeti simplifies the recording process; it connects directly to your computer via USB, eliminating the need for complex setups or external audio interfaces.
Its plug-and-play functionality, combined with compatibility across Windows and Mac, makes it exceptionally user-friendly for both beginners and experienced users.
Why Choose the Blue Yeti Nano?
The Blue Yeti Nano is a compact and streamlined version of the original Yeti, perfect for those seeking portability and simplicity. Despite its smaller size, it delivers exceptional audio quality suitable for streaming, podcasting, and gaming.
Like the standard Yeti, the Nano boasts a plug-and-play USB connection, requiring no drivers for immediate use.
It’s also fully compatible with popular platforms like Discord, OBS, and XSplit, ensuring seamless integration into your existing setup.

Unboxing and Components
Your Blue Yeti kit includes the microphone itself, a USB cable, and essential instructions conveniently packaged within the kit bag for easy access.
Microphone Contents
Upon opening your Blue Yeti package, you’ll discover several key components designed for immediate use and optimal performance. The core of the package is, of course, the Yeti Nano microphone itself, boasting a compact yet powerful design. Included is a high-quality USB cable, ensuring a stable connection to your computer.
Critically, the kit also contains a set of detailed instructions, conveniently located within the kit bag, guiding you through setup and operation. These instructions cover connecting to both Windows and Mac systems, ensuring a smooth user experience from the start.
Identifying the Parts
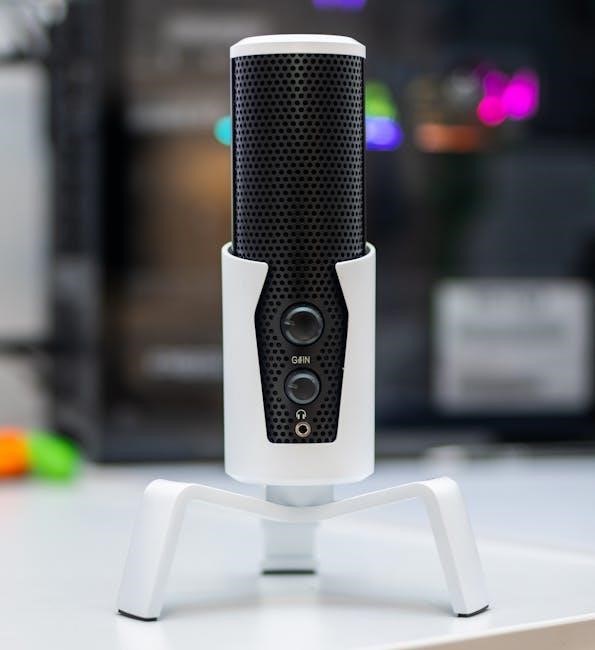
The Blue Yeti Nano microphone features a straightforward design. Begin by recognizing the microphone body itself, noting the mesh end which should always face upwards during operation. Locate the adjustment screws on either side; these secure the microphone’s position.
You’ll also find the USB port for connecting to your computer, and the integrated headphone jack for direct monitoring. Familiarize yourself with the gain control knob, polar pattern selector, and the prominent mute button – essential for controlling your audio input.

Setting Up Your Blue Yeti
Setting up is simple: connect the Yeti Nano to your Mac or PC via USB, select it as your recording input, and start creating content immediately!
Connecting to Windows
Connecting your Blue Yeti to a Windows computer is straightforward. Simply plug the USB cable into an available USB port on your PC. Windows should automatically detect the microphone and configure it for use.
Next, within your desired recording or streaming software (like OBS or Discord), select “Blue Yeti” as your input device. If it doesn’t appear immediately, restart the software. No additional driver installation is typically required for seamless operation on Windows systems.
Connecting to Mac
Connecting the Blue Yeti to your Mac is remarkably simple. Just plug the USB cable into an available USB port on your Macintosh computer. macOS should automatically recognize the microphone and prepare it for use without needing extra steps.
Within your preferred software – be it for recording or streaming like GarageBand or OBS – choose “Blue Yeti” as your audio input. If it’s not immediately visible, restarting the application often resolves this.
Driver Installation (or Lack Thereof)
Fortunately, the Blue Yeti microphone is designed for plug-and-play functionality, meaning no dedicated driver installation is typically required for either Windows or macOS systems. Upon connection, your operating system should automatically detect and configure the microphone for immediate use.
This streamlined process simplifies setup, allowing you to quickly begin recording or streaming without the hassle of searching for and installing drivers. However, for advanced customization, Blue Sherpa software is available.
Understanding the Microphone Controls
The Blue Yeti features intuitive controls for gain, polar patterns, headphone volume, and a convenient mute button, allowing for precise audio adjustments during use.
Gain Control
The gain control on your Blue Yeti microphone adjusts the sensitivity of the microphone, impacting the signal level. Rotating the gain knob clockwise increases sensitivity, capturing quieter sounds but potentially introducing more background noise. Conversely, decreasing the gain reduces sensitivity, ideal for louder sources.
Carefully adjust the gain to find the optimal balance, ensuring a strong signal without unwanted distortion. Monitoring the input level within your recording software is crucial for achieving the best audio quality.
Polar Pattern Selection
The Blue Yeti features multiple polar patterns, selectable via a dial on the microphone. These patterns determine the direction from which the microphone picks up sound. Choosing the correct pattern is vital for optimal recording quality.
Options include Cardioid (front), Stereo (left/right), Omnidirectional (all directions), and Bidirectional (front/back). Experiment with each pattern to determine which best suits your recording environment and desired sound capture.
Headphone Volume Control
The Blue Yeti incorporates a dedicated headphone volume control, conveniently located on the microphone itself. This allows for real-time adjustment of the audio level sent to your headphones, ensuring comfortable monitoring during recording or streaming sessions.
Simply rotate the control knob to increase or decrease the volume to your preference. This feature is crucial for avoiding feedback and achieving a clear, balanced audio experience without needing software adjustments.
Mute Button
The Blue Yeti features a prominent mute button, strategically positioned for quick and easy access. A simple press instantly silences the microphone, providing immediate control over your audio output during live streams or recording sessions.
When muted, the microphone’s status indicator light illuminates red, offering clear visual confirmation. This prevents accidental broadcasting of unwanted sounds and ensures privacy when needed, streamlining your workflow effectively.

Polar Patterns Explained
The Blue Yeti offers versatile polar patterns—Cardioid, Stereo, Omnidirectional, and Bidirectional—allowing tailored sound capture for diverse recording scenarios and optimal audio quality.
Cardioid Mode
Cardioid mode on the Blue Yeti is your go-to setting for most common recording situations. It picks up sound primarily from the front of the microphone, rejecting noise from the sides and rear;
This makes it perfect for solo podcasting, voiceovers, singing, or streaming where you want to isolate your voice and minimize room echo or background distractions. Simply position the microphone so the Blue logo faces your sound source for optimal results!
Stereo Mode
Stereo mode utilizes both the left and right channels of the Blue Yeti, creating a wider, more spacious sound image. This is ideal for recording instruments, interviews, or ambient sounds where capturing a sense of space is desired.
It provides a natural and realistic audio experience, simulating how sound is perceived by human ears. Experiment with positioning to achieve the desired stereo width and depth in your recordings!
Omnidirectional Mode
Omnidirectional mode on the Blue Yeti captures sound equally from all directions. This setting is perfect for recording multiple sound sources simultaneously, like a group discussion or a band rehearsal. It excels at capturing the ambiance of a room, providing a natural and open sound.
However, be mindful of background noise as it will be recorded alongside your intended audio source. Careful placement is key for optimal results!
Bidirectional Mode
Bidirectional mode, also known as Figure-8, picks up sound from the front and rear of the microphone while rejecting audio from the sides; This is ideal for interviews or duets, where two people are facing each other. It’s excellent for capturing a conversation with distinct separation between voices.
Ensure speakers are positioned directly opposite the microphone for the best sound quality and minimal bleed.
Optimizing Audio Recording
To begin, point the microphone towards your desired sound source—the front of the microphone features the Blue Microphones logo.
Microphone Placement
Optimal placement is crucial for excellent audio quality. Position the Blue Yeti vertically, ensuring the mesh end faces upwards. Direct the front of the microphone – identified by the Blue Microphones logo – towards the intended sound source.
Experiment with distance; closer proximity yields a stronger signal, but may increase sensitivity to plosives. Consider your recording environment; minimizing background noise and reflections will significantly improve clarity. A stable surface is also recommended to avoid unwanted vibrations.
Pop Filters and Wind Screens
Utilizing a pop filter or wind screen dramatically enhances recording quality by reducing plosive sounds – harsh bursts of air from ‘p’ and ‘b’ sounds. These accessories minimize distortion and deliver a cleaner, more professional audio result.
Position the filter a few inches from the microphone capsule. Wind screens are particularly useful for outdoor recordings, shielding against ambient noise. Both are readily available and simple to attach, improving overall sound clarity.
Adjusting Input Levels
Proper input level adjustment is crucial for optimal audio. Begin by speaking or singing into the microphone at your typical volume. Monitor the gain control on the Yeti; aim for levels peaking around -6dB to -3dB in your recording software.
Avoid “clipping,” where the signal becomes distorted due to being too loud. Adjust the gain slowly, testing as you go, to find the sweet spot for clear, dynamic recordings without unwanted noise or distortion.

Software Compatibility
The Blue Yeti seamlessly integrates with popular software like OBS, XSplit, Discord, Audacity, and GarageBand, enhancing your streaming and recording experiences.
Streaming Software (OBS, XSplit)
For game streamers, the Blue Yeti Nano demonstrates excellent compatibility with widely-used live streaming programs. These include Open Broadcaster Software (OBS), and XSplit, providing clear audio for your audience.
Simply select the Yeti Nano as your recording input within your chosen software. Detailed setup instructions and further compatibility information can be found on the official Blue Designs website at bluedesigns.com, ensuring a smooth streaming setup.
Discord Integration
The Blue Yeti Nano seamlessly integrates with Discord, enhancing your voice communication experience. It’s readily compatible with this popular platform, allowing for clear and crisp voice chat during gaming sessions or online conversations.
To utilize the Yeti Nano with Discord, simply select it as your input device within Discord’s voice settings. This ensures optimal audio quality for all your interactions, providing a professional sound for your online community.
Recording Software (Audacity, GarageBand)
The Blue Yeti works wonderfully with popular recording software like Audacity and GarageBand, offering versatility for various audio projects. Simply designate the Yeti Nano as your recording input within these programs to capture high-quality audio.
Whether you’re podcasting, creating music, or recording voiceovers, the Yeti Nano delivers exceptional clarity. Its compatibility ensures a smooth workflow, allowing you to focus on your creative process without technical hurdles.

Troubleshooting Common Issues
If no sound is detected, ensure the Yeti Nano is selected as your recording input within your software settings. Check USB connections too!
No Sound Detected
Experiencing no sound? First, verify the Blue Yeti Nano is correctly chosen as your recording input within your specific software – be it streaming or recording applications. Double-check the USB connection; a loose or faulty cable can prevent signal transmission.
Ensure the microphone isn’t muted via the physical mute button on the device itself. Also, confirm your system’s sound settings recognize the Yeti Nano as an active input device. Restarting your computer can sometimes resolve driver-related issues.
Distorted Audio
If audio sounds distorted, the gain might be set too high, causing clipping. Reduce the gain control on the Blue Yeti Nano to lower the input level. Ensure the sound source isn’t too close to the microphone, as excessive volume can also lead to distortion.
Check for any interference from other electronic devices. Experiment with microphone placement and consider using a pop filter to minimize plosives and improve clarity. Adjust input levels within your recording software as well.
Microphone Not Recognized
If your computer doesn’t recognize the Blue Yeti, first try a different USB port. A USB hub might not provide sufficient power; connect directly to your computer. Ensure the USB cable is securely connected at both ends and consider testing with a different cable.
Restart your computer and check device manager (Windows) or system information (Mac) to see if the microphone is listed. Verify that the Yeti isn’t muted via the physical mute button.
Advanced Settings & Customization
Blue Sherpa software allows for firmware updates and customized audio settings. Explore these options to fine-tune your Yeti’s performance and personalize your recording experience.
Using Blue Sherpa Software
Blue Sherpa is a dedicated software suite designed to enhance your Blue Yeti experience. It provides a centralized hub for managing firmware updates, ensuring your microphone operates with the latest features and improvements.
Beyond updates, Sherpa allows for advanced customization of your Yeti’s settings. You can visualize gain levels, adjust sample rates, and explore various audio configurations to optimize sound quality for specific recording scenarios.
The software’s intuitive interface simplifies complex settings, making it accessible for both beginners and experienced users seeking precise control over their audio.
Firmware Updates
Keeping your Blue Yeti’s firmware current is crucial for optimal performance and access to new features. Blue regularly releases updates that address bug fixes, improve audio quality, and enhance compatibility with various operating systems and software.
The Blue Sherpa software simplifies the update process. Simply connect your Yeti, launch Sherpa, and the application will automatically check for available updates.
Follow the on-screen instructions to install the latest firmware, ensuring a stable and reliable recording experience.
Power Requirements & USB Considerations
The Blue Yeti is powered directly via USB, but using a USB hub might limit functionality; a direct connection to your computer is recommended.
USB Hubs and Power
Blue Yeti microphones draw power directly from the USB port they’re connected to. While USB hubs can sometimes work, they often don’t provide sufficient power for optimal performance, potentially causing audio issues.
To ensure stable operation and the best sound quality, it’s strongly advised to connect your Yeti directly to a USB port on your computer—avoiding hubs whenever possible.
If you must use a hub, opt for a powered USB hub to guarantee adequate power delivery to the microphone.
USB Cable Quality
The USB cable included with your Blue Yeti is designed to deliver reliable power and data transfer. However, using a different USB cable can sometimes impact performance.
If you experience issues, especially with audio dropouts or distortion, try using the original cable. Ensure any replacement cable is a high-quality USB 2.0 or higher, and is of sufficient length—excessively long cables can degrade the signal.
A poor-quality cable may not provide stable power.
Cleaning and Maintenance
Regular cleaning ensures optimal performance. Gently wipe the microphone with a slightly damp cloth. Store it in a dust-free location when not in use.
Cleaning the Microphone
To maintain your Blue Yeti’s pristine audio quality, regular cleaning is essential. Begin by disconnecting the microphone from your computer; Use a soft, slightly damp cloth to gently wipe down the microphone body and mesh grille. Avoid abrasive cleaners or solvents, as these can damage the finish.
For stubborn grime, a very mild soap solution can be used, ensuring the cloth is only damp, not wet. Always dry the microphone thoroughly before reconnecting it. Proper cleaning extends the lifespan and ensures consistent performance.
Storage Recommendations
When not in use, store your Blue Yeti microphone in a clean, dry environment, away from direct sunlight and extreme temperatures. A dust cover or the original packaging is highly recommended to protect the grille and body from dust accumulation and potential damage.
Avoid storing the microphone in humid locations, as moisture can corrode internal components. Proper storage ensures longevity and maintains optimal performance when you’re ready to record again, preserving your investment.
Frequently Asked Questions (FAQ)
Yes, the Blue Yeti can be used with smartphones via a Lightning to USB adapter or a USB-C adapter, offering versatile recording options.
Can I use the Blue Yeti with my phone?
Absolutely! While designed for computers, the Blue Yeti microphone can be connected to your smartphone for high-quality mobile recording. However, a standard USB connection won’t work directly.
You’ll require an appropriate adapter – either a Lightning to USB adapter for iPhones or a USB-C to USB adapter for many Android devices. These adapters provide the necessary interface for the Yeti to communicate with your phone, unlocking its potential for mobile podcasting, voiceovers, or music recording on the go.
What is the difference between the Yeti and Yeti Nano?
The Yeti Nano is a smaller, more compact version of the original Blue Yeti. While both deliver excellent sound quality, the Nano is designed for portability and simplicity.
It features fewer polar patterns (cardioid and omnidirectional versus the Yeti’s four) and lacks the physical gain control knob. The Nano is perfect for streamers and podcasters needing a streamlined setup, while the Yeti offers greater versatility and control for advanced users.

Resources and Support
For assistance, visit the official Blue Microphones website (bluedesigns.com) for detailed manuals, FAQs, and community forums to connect with other users.
Blue Microphones Website
The official Blue Microphones website (bluedesigns;com) serves as a central hub for comprehensive support resources. Here, you’ll discover downloadable manuals for the Yeti and Yeti Nano, covering setup, operation, and troubleshooting. Extensive FAQs address common user questions, while a dedicated support section allows direct contact with Blue’s customer service team.
Furthermore, the website provides access to the latest firmware updates, ensuring optimal microphone performance and compatibility. Explore the site to unlock the full potential of your Blue Yeti!
Online Forums and Communities
Numerous online forums and communities are dedicated to Blue Yeti users, offering a wealth of shared knowledge and troubleshooting assistance. These platforms provide a space to connect with fellow enthusiasts, exchange tips, and find solutions to common issues.
Search online for dedicated Blue Yeti forums or broader audio recording communities. Users frequently share detailed guides, custom settings, and helpful advice, supplementing the official documentation and providing peer-to-peer support.
Warranty Information
Blue Yeti microphones are backed by a limited warranty, protecting against defects in materials and workmanship. Details are available on the Blue Microphones website.
Blue Yeti Warranty Details
Blue Microphones provides a limited warranty covering defects in materials and workmanship for a period of two years from the date of purchase. This warranty doesn’t cover damage from misuse, accidents, or unauthorized modifications.
To make a claim, contact Blue Support with proof of purchase. The warranty ensures your Yeti functions as intended, offering peace of mind. Full warranty terms and conditions are detailed on the official Blue Microphones website, outlining coverage specifics and limitations.
Contacting Blue Support
For assistance with your Blue Yeti microphone, visit the official Blue Microphones website – bluedesigns.com – to access their support resources. You’ll find FAQs, troubleshooting guides, and contact information for their customer support team.
Direct support can be reached through their online form or by exploring community forums. These forums offer solutions from fellow users and Blue representatives, providing a collaborative approach to resolving any issues you may encounter.